How to Upload a Private Course on Wix
How To Use the Wix Website Architect in 2022
Wix is one of the best website builders for small concern owners and entrepreneurs. In fact, the Wix website architect ranks 2d in our Best Website Builder Review.
We gave Wix one of our highest ratings based on its ease of use. (For more than details, read our full Wix Website Architect Review.) Still, fifty-fifty extremely intuitive tools can sometimes seem a bit tricky in certain areas. That's why we created this tutorial to walk you lot through some of Wix'southward most mutual tasks plus several that may feel slightly more complicated.
Set up to offset a Wix site? Bank check out our Wix Pricing and Plans Guide
If you oasis't started building a website for your business and want a very elementary, stride-by-pace tutorial to help you get one up and running within a day, check out our How To Make a Wix Website guide.
Signing Upward With Wix
Creating an account with Wix is easy. Just navigate to the Wix.com homepage and click on the "Get Started" button. From there, yous'll have the option to log in or sign up. Click on the "Sign Up" button.
You'll then need to enter and reenter your email address to confirm it equally well as create and confirm a password. You lot'll likewise have the option to sign in via your Facebook® or Google account.

Using Wix Templates
Wix templates provide users with premade website layouts. Wix offers quite a few of them, which makes it like shooting fish in a barrel to find one that'll work for the kind of website yous want to create.
Wix sorts its templates into five categories:
- Business & Services
- Store
- Creative
- Community
- Blog
Business & Services templates characteristic designs that highlight a company's products and services.
Store templates aid users establish an ecommerce hub where customers can select and purchase products.
Creative templates enable artists and illustrators to showcase their visual work in an attractive format.
Community templates encourage interaction among members by helping them find and share relevant content as well as join discussions on topic threads.
Blog templates provide infinite for users to publish articles about relevant topics.
Choosing a Wix Template
Once y'all create a Wix account, the Wix website builder volition prompt you with a push button to "Create New Site." Click on that push button to get started.
The next page will prompt you to choose which kind of website you want to create.

Choose the type of website that's most appropriate for your needs. Wix will so present y'all with two options:
- Let the Wix artificial design intelligence (ADI) tool create a website for yous. If you lot choose this option, you'll need to answer a few simple questions and automatically get a website designed for you in just minutes.
- Create your website with the Wix Editor. In this option, you lot'll start with a template and make it your own by using elevate-and-driblet tools and thousands of blueprint features.
Click on the second option to cull a template. This'll open the "Choice the Website Template Yous Love" folio where you can browse a wide variety of template options.
You also can search for a specific type of template on this folio or choose from the options at the top of the screen, which lead to templates designed for specific types of businesses.

When you lot scroll over each template option, two buttons will appear superimposed onto the image: "Edit" and "View." Click on the "View" button to open a preview of the template in a small window.
At the lesser of this window, you lot'll notice a "View Full Demo" link. Click on that link to open up a new tab that displays the full template. Y'all can then see how each office of that specific template looks and exam its navigation.
Here are some key questions to consider when choosing a template:
- How many pictures and videos do yous desire to comprise?
- What sections do you desire included on the principal navigation bar?
- What happens to the menu bar when y'all ringlet down a page?
- Do you like the color scheme, font, and layout? (You lot can accommodate these aspects later, but a template that already meets your needs in these areas will make information technology faster and easier to create your website.)
- Does the folio layout come across your needs?
- Does the style of the template reverberate the image you lot want to project?

When you observe a template you like, click on the "Edit" button to start customizing it to meet your exact needs.
Switching Templates
In one case y'all choose a template in the Wix website builder, you can't modify it to another template. But, Wix does allow you to create several sites on the back end of its platform and reassign your domain to a new site. This fashion, you can customize your new template without disturbing your live website.
Working With Wix Pages
Wix makes it easy to manage the pages on your website. When you edit a Wix template, you'll see a "Pages" icon at the top of the right-paw toolbar. Clicking on this tab will open a carte du jour of options for decision-making your site carte, creating dynamic pages, and choosing page transitions.
The "Site Carte du jour" push button controls the main navigation menu and the pages included on your website.
The "Dynamic Pages" push button enables you lot to create a page that can modify its content while retaining its layout and pattern.
The "Page Transitions" push button allows you to command the visuals your site will display when visitors move between pages.

Adding, Deleting, and Moving Pages
Based on your specific business needs, you can add, delete, or move pages within your website.
Adding a Folio
To add a folio to your website, click on the "Pages" icon at the elevation of the correct-hand toolbar. A menu volition appear with a "+ Add Page" button at the bottom. Click on that button.
A pop-up window will and then appear with a list of pages, including one item labeled "New Page." When you click on this, a blank form will announced in which you can enter the name of the new page. Type in that page name and click on the "Enter" button. The new page's name will then automatically appear on your site's principal navigation carte du jour next to "Dwelling."
Moving a Folio
To movement a folio in your primary navigation bill of fare, click on the "Pages" icon at the meridian of the right-hand toolbar. Place your cursor over the page you desire to move, and then click and elevate it to the desired spot.
Deleting a Page
To delete a page, click on the "Pages" icon at the top of the right-hand toolbar. Hover over the ellipsis ("...") push button next to the folio you desire to delete, and so click on that button. This'll open a menu of options with "Delete" at the bottom of the list.

Setting up Wix Site Navigation
You can gear up up your Wix website's navigation from the same menu that provides options to create or delete a page. Start past clicking on the "Pages" icon at the top of the right-paw toolbar.
Reordering a Navigation Menu
In the menu that appears later you click on the "Pages" icon, click and drag each detail until they appear in your desired order. Your website's main navigation toolbar will automatically update to reverberate this new social club.
Creating a Submenu or Subpage
To create a subpage, click on the "Pages" icon and then click on the "+ Add Page" push. A new item — chosen "New Page" — will then appear on the menu. Click on this item and enter the name of the subpage you desire to create. Now, click on the ellipsis ("...") button next to that page and select "Subpage" from the list of options.
Your new page volition automatically announced as a subpage of the page listed directly higher up it in your site's main navigation menu. To move information technology to another place, click and elevate the subpage until it appears directly below the folio to which it relates.

Hiding a Menu Item
In order to hide a carte du jour item, click on the "Pages" icon at the acme of the right-hand toolbar. Hover over the folio yous want to hide, click on the ellipsis ("...") button adjacent to it, then select "Hide" from the list of options.
How to Apply Wix Content Director
Wix'due south Content Managing director feature controls all the content that appears on your website. You tin can find the icon for it at the bottom of the right-mitt toolbar. Using this feature, you can create collections and add content elements.
Creating Collections
You shop your website'due south content within various collections. The content you store can include content you create, content you collect from your site visitors, or both.
To create a drove, click on the "Content Manager" icon at the bottom of the right-manus toolbar. This opens a "Contact Manager" menu where you'll meet a "Content Manager" push button at the superlative. (Wix automatically highlights that push when you click on the "Content Director" icon.)

Click on the "Create New Collection" button. The bill of fare that opens adjacent will prompt you to enter the proper name of the new drove. It'll then ask what this collection will include and provide a drop-down menu with the following options:
- Site Content
- Form Submission
- Member-Generated Content
- Members-Merely Content
- Members-Only Form Submission
- Private Data
- Custom Use
Once you enter a name for your new collection and choose the type of content it'll include, a content dashboard will appear. From this dashboard, you can add new items, control their appearance and placement on your website, and then push that drove of content live from the Sandbox examination environment.
Adding Content Elements
The 2nd push on the "Content Manager" menu provides options for adding different content elements. Click on the "Add Content Elements" button to open a menu of options.
The starting time option involves adding a dynamic page template. This is a preset collection with pages for your content. Yous tin can choose to piece of work with a blank template or use one of the post-obit premade page templates from Wix:
- Team
- Projects
- News
- Portfolio
- Real Estate Listings
- Recipes
- Jobs
- Courses
- Services

One time you make a option, the Wix website architect will open the dynamic page in a preset template you can then edit to suit your needs.
Deleting a Collection
To delete a collection, click on the "Content Manager" icon at the bottom of the right-mitt toolbar. Hover over the drove y'all want to delete, click on the ellipsis ("...") button side by side to it, and then select "Remove Drove" from the list of options.
Changing Backgrounds in Wix
Wix makes changing the background of your website easy. You lot can control the color, photos, and videos that found your background directly from this website builder's main toolbar.
Click on the "Background" icon in the right-hand toolbar, which appears 2d from the top. A carte with three options — "Colour," "Paradigm," and "Video" — will then appear.
Select the "Color" option to open up the "Color Picker" tool. This tool allows y'all to choose either a "Theme Color" or a "Custom Colour."
If you lot choose to use a photo as your groundwork, select the "Prototype" option. This'll open a dashboard that allows yous to choose your preferred photo. You tin either upload your ain photo or choice one from the options available via Wix, Shutterstock, or Unsplash.

If you lot choose to apply a video as your background, select the "Video" selection. This'll open a dashboard like to the images dashboard, just without an Unsplash option.
Clicking on the "Change Background" push will adjust the background for the page you currently accept open up in the Wix Editor. You tin extend the changes to all the pages of your website by selecting the "Utilize to Other Pages" button at the bottom of the dashboard screen.
Notation: Endeavor to make your groundwork images at least ii,000 pixels wide by at least ane,000 pixels loftier to ensure they display conspicuously on all screen sizes.
Customizing Fonts in Wix
Wix allows you to modify the font, size, and way of all the text on your website with just a few clicks.
Irresolute Fonts in Headings and Body Text
To change the font used in a heading or trunk text on your Wix website, start by clicking on the text you desire to edit. A box will then announced effectually the text with several buttons underneath. These buttons enable you lot to edit or pattern that text, add animation to information technology, become assistance, or connect information technology to data through a link.
Click on the "Edit Text" button to open a menu of options, including font mode, font size, and font color. You can then adjust these elements of the font, as desired.
Changing Fonts in "Content Template" Text
To alter the font of text in boxes imported to your website via the "Content Template," start past clicking on the text y'all want to edit. A box will and so appear effectually that text with several buttons underneath. These buttons enable you to edit or design that text, add together animation to information technology, get help, or connect it to information through a link.
Click on the "Design Text" button to open a bill of fare of options, including the font style, font size, and font color. You lot can and then accommodate these elements of the font, every bit desired.

Adjusting Text Size and Style
To change the font advent of any piece of text on your Wix website while leaving the site's overall font settings the same, start by clicking on the text you lot want to edit. A box will then appear around that text with several buttons underneath. These buttons enable you to edit that text, get text ideas, add blitheness, get help, or connect that text to data through an embedded link.
To alter the properties of the lettering, click on the "Edit Text" button. Y'all can add movement with the "Animation" push button also as adjust the shape and size of the text box.
Changing the Width of a Piece of Text
To change the width of a slice of text, commencement by clicking on the text you desire to edit. A box volition so appear around that text. Click and drag the sides of the box to create your desired width.
Using Columns in Wix
Columns enable you to arrange information on your website in attractive, easy-to-read sections of text. Setting them up in Wix is both simple and quick.
Creating Columns
Click on the "Add" icon — the tertiary option — in the correct-hand toolbar. This will open up a menu to the right of the main toolbar from which y'all'll select the "Strips" pick. You'll meet strips for specific types of information, like your site's "About" and "Contact" pages.
If you don't want to create a column for ane of the bachelor options, select the "Classic" option at the lesser of the list. You can then choose from solid white, solid black, and several photo backgrounds.
Once y'all insert your strip into your spider web page, a "Change Strip Groundwork" push button will announced above information technology along with five control icons. Click on the "Layout" icon, which appears second. This'll open up a popular-upward window from which you lot can add together up to five columns and decide the text layout for each column.

Calculation Text in Columns
To add together text in your columns, click on the "Add together" icon in the right-hand toolbar. When the "Add together" carte opens, select the "Text" pick. A listing of different types of text will so appear to the left, including headings, paragraphs, and titles.
Click on the type of text you want to create, and and so elevate it to the column where yous want it to announced. Once the text appears in that column, click on it to open a menu with the "Edit Text" button. When you click on this button, the Wix Editor will highlight that text and a cursor will appear. Yous can at present type in your desired text.
Working With Images in Wix
Wix also makes it easy to upload images to your website or find high-quality, royalty-gratuitous images through Shutterstock and Unsplash.
Advisedly consider the post-obit every bit you upload images to your Wix website:
- Make sure yous can legally use the image — because you own it, because information technology'south a royalty-free image, or because you bought a license to use information technology on your website.
- Make sure the paradigm isn't and then large that it slows downwardly your website. You can utilize tools similar PicResize® to easily resize images.
Adding Single Images
To add together a unmarried image with the Wix website builder, click on the "Add together" icon in the right-hand toolbar. When the "Add" menu opens, select the "Paradigm" option. You can and then select an paradigm from your reckoner with the "My Uploads" tab; cull from Wix's drove of images, Illustrations, and stock photos with the "Paradigm Collections" tab; or pull images from your social media accounts with the "My Social Images" tab.
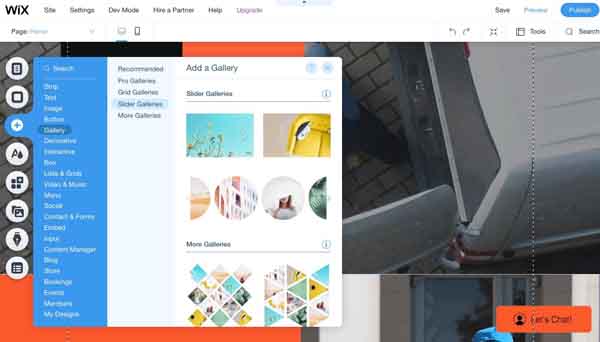
Adding an Epitome Slideshow
To add an paradigm slideshow to your Wix website, click on the "Add" icon in the right-mitt toolbar. When the "Add" menu opens, select the "Gallery" selection, and then "Slider Gallery" from the list of items.
Y'all can choose to add a slider gallery with arrows, a postcard slider, or a slider of sphere-shaped photos.

Adding an Image Gallery
To add together an image gallery to your Wix website, click on the "Add" icon in the right-hand toolbar. When the "Add" menu opens, select the "Gallery" selection. Yous'll then have the option to create the following types of epitome galleries:
- Recommended
- Pro Galleries
- Filigree Galleries
- Slider Galleries
- Honeycomb*
- Animated Slide*
- Freestyle*
- 3D Carousel*
* Y'all'll find these options under the "More Galleries" tab.
Follow the prompts to create your new image gallery. When you're washed, click on the "Save" push and the gallery will automatically announced on your spider web page. You tin then drag information technology to your preferred location on that folio.
Deleting Images
To delete a single image, simply right-click on the image and click on the "Cut" button.
To delete an paradigm inside a Wix gallery, click on the gallery so the "Modify Images" tab. When you hover over the photo yous want to remove, a trashcan icon will announced in the bottom-right corner. Click on that icon to delete the photo.
Creating Links in Wix
To create links using the Wix website builder, you can either add together a button to your site or add a hyperlink to its existing text.
Adding Buttons in Wix
Click on the "Add" icon in the right-manus toolbar. When the "Add together" menu opens, select the "Push" option. You'll and then have the option to add together the following types of buttons:
- Themed
- Text and Icon
- Icon
- Document
- Upload
- iTunes®
- Wix Chat
- Pay
- PayPal®
Adding Text Links in Wix
To add together a text link to your Wix website, click on the block of text where you want to embed the link followed past the "Edit Text" button. Highlight the words you desire to contain the link, and then click on the "Link" icon at the far right of the next-to-final row of editing options.

Calculation Favicons and Footers in Wix
You can further dress up your page with Favicons and footers.
Adding a Favicon in Wix
Favicons — tiny prototype icons that identify a website in an internet browser tab — appear when you salvage a website in your "Favorites" list or information technology joins your browser history page.
You can create a favicon with a tool like Favicon.io. It delivers a favicon in a ZIP file. Yous can then open the favicon.ico file and use it as your favicon.
To add together a favicon to your Wix website, outset by clicking on the "Settings" option in the toolbar at the summit of the Wix Editor screen. This will open a card from which you'll choose the "Favicon" button. You can so upload your favicon. (Notation: Y'all'll need to purchase one of Wix's Premium website plans in order to apply this characteristic.)
Adding a Footer in Wix
To add a footer to your Wix website, click on the "Add" icon in the right-hand toolbar. When the "Add" menu opens, select the "Text" selection to create a new text box. Side by side, elevate that text box to the bottom of the web page and click on the "Move To Footer" option that appears higher up the text box.
Undoing Your Edits in Wix
With the Wix website builder, it's simple to undo whatever edits you make. The editing toolbar at the top of the Wix Editor screen features ii curved arrows. The one pointing to the left erases edits while the one pointing to the right repeats them. To undo whatsoever modify you brand to your Wix website, simply click on the "Undo" arrow.

The Wix website architect does accept an autosave office that you can turn on or off, simply information technology's a practiced thought to click on the "Relieve" button periodically. You'll find the "Save" button in the toolbar at the top of the Wix Editor screen — it'southward one of iii options on the far right.
Terminal Thoughts
Additional Resources

How To Construction a Website

How To Build a WordPress Website

Best Plug-Ins for a WordPress Site

How To Drive Traffic To Your Website
Source: https://howtostartanllc.com/how-to-build-a-website/how-to-use-wix
0 Response to "How to Upload a Private Course on Wix"
Post a Comment